
<span id="top"></span>
Measuring Qualified's ROI with our Salesforce unmanaged package
One of the most important questions you can answer is: "How much pipeline and revenue is Qualified sourcing and influencing for my business?" We've made it easy to answer this with our Salesforce unmanaged package, which automatically connects Qualified-powered conversations and meetings to the opportunities they impact.
This package includes pre-built reports, a dashboard, and two custom flows to help you measure ROI and make data-driven decisions.
- What you can measure with this package
- Steps to install the package
- What’s included in the package
- Configure the attribution window
- Configure opportunity association
<span id="what-can-you-measure"></span>
What you can measure with this package
By installing this package, you'll be able to answer critical questions right from your Salesforce dashboard:
- How many open opportunities have had a Qualified conversation or meeting?
- How many conversations and meetings does it take to create an opportunity?
- How many conversations and meetings does it take to help win an opportunity?
- How much pipeline has Qualified sourced and influenced?
- How much revenue has Qualified sourced and influenced?
<span id="steps-to-install"></span>
Steps to install the package
Getting set up is a straightforward process. Let's walk through the steps.
Step 1: Enable opportunity historical trending.
First, you’ll need to make sure "Opportunity Historical Trending" is enabled in your Salesforce org. This feature is necessary for the reports to work correctly.
This includes the five default opportunity fields:
- Amount
- Close Date
- Forecast Category
- Probability
- Stage
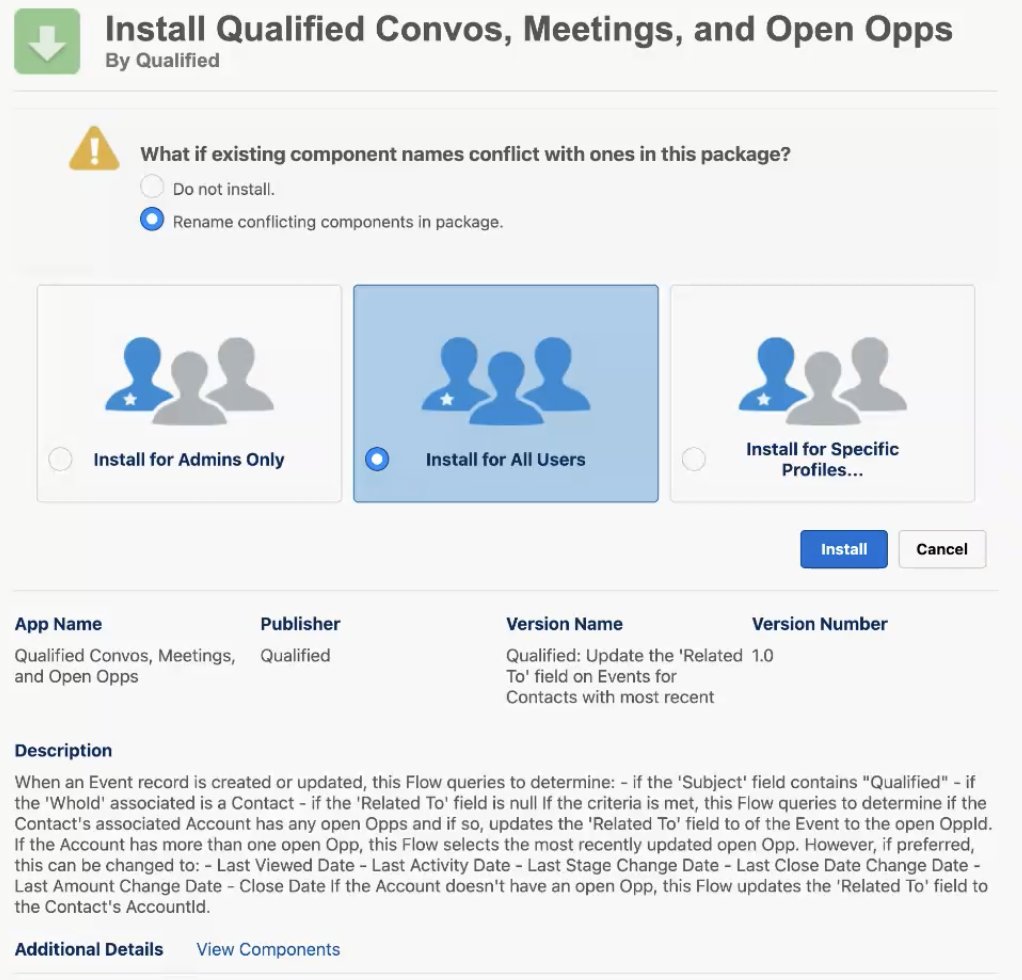
Step 2: Install the unmanaged package.
Next, use the link below to install the package into your Salesforce environment. No password is required.
Install the Qualified ROI Package Here
And that's it! The package is installed.
<span id="whats-included"></span>
What’s included in the package?
The package automatically adds several components to your Salesforce org to start tracking ROI immediately.
- Two Custom Fields on the Opportunity Object:
Last Modified Date = YesterdayQualified Convo or Meeting?
- Five Pre-Built Reports:
- All Qualified Conversations & Meetings
- Qualified | Influenced Pipeline
- Qualified | Influenced Revenue
- Qualified | Sourced Pipeline
- Qualified | Sourced Revenue
- One Pre-Built Dashboard:
- The
Qualified.com ROI Attribution/Influence Dashboardgives you a high-level view of performance.
- The
- Two Custom Flows: These flows do the heavy lifting of connecting Qualified activities to opportunities.
- Relate New Opps to Qualified Events: This scheduled flow runs daily at 2:15AM local time. It looks for recently modified open or won opportunities and connects any relevant Qualified events (conversations or meetings) that occurred within 90 days prior to the opportunity's creation date.
- Relate New Qualified Events to Open Opps: This flow runs whenever a new Qualified event is created. It automatically associates the event with an existing open opportunity on that account.
<span id="attribution-window"></span>
Configure the attribution window
By default, the flows consider a Qualified event as an "influence" if it occurred within 90 days of the opportunity creation date. We've found this is a great starting point, but you can customize this window to match your sales cycle.
To change this setting, navigate to the flow labeled 'Relate New Opps to Qualified Events' and adjust the number of days in the logic.
<span id="opportunity-association"></span>
Configure opportunity association
When an account has multiple open opportunities, the package needs to know which one to associate a new Qualified event with. By default, the flow assigns the event to the opportunity with the highest probability, as this is typically the one furthest along in the sales process.
However, you can change this logic based on what makes the most sense for your business.
To configure this setting:
- Navigate to Setup > Flows and select the flow named ‘Relate New Qualified Events to Open Opp’.
- Open the ‘Get Records: Get Open Opps’ element.
- Scroll to the ‘Sort by’ field and select the field you want to use as the primary criteria. You can choose from several options, including:
- Opp Last Activity Date
- Opp Last Stage Change Date
- Opp Close Date
- Click ‘Done’, then ‘Save’ and ‘Activate’ the flow.
Heading 1
Heading 2
Heading 3
Heading 4
Heading 5
Heading 6
Lorem ipsum dolor sit amet, consectetur adipiscing elit, sed do eiusmod tempor incididunt ut labore et dolore magna aliqua. Ut enim ad minim veniam, quis nostrud exercitation ullamco laboris nisi ut aliquip ex ea commodo consequat. Duis aute irure dolor in reprehenderit in voluptate velit esse cillum dolore eu fugiat nulla pariatur.
Lorem ipsum dolor sit amet, consectetur adipiscing elit, sed do eiusmod tempor incididunt ut labore et dolore magna aliqua. Ut enim ad minim veniam, quis nostrud exercitation ullamco laboris nisi ut aliquip ex ea commodo consequat. Duis aute irure dolor in reprehenderit in voluptate velit esse cillum dolore eu fugiat nulla pariatur.
Lorem ipsum dolor sit amet, consectetur adipiscing elit, sed do eiusmod tempor incididunt ut labore et dolore magna aliqua. Ut enim ad minim veniam, quis nostrud exercitation ullamco laboris nisi ut aliquip ex ea commodo consequat. Duis aute irure dolor in reprehenderit in voluptate velit esse cillum dolore eu fugiat nulla pariatur.

Block quote
Ordered list
- Item 1
- asdfasdf
- asdfasdf
- asdfasdf
- Item 2
- Item 3
Unordered list
- Item A
- Item B
- Item C
Bold text
Emphasis
Superscript
Subscript
|
|---|
|


.svg)


